How to sterilize bottles on the stove
How to Sterilize Baby Bottles
Once you’ve done your research and decided on the best bottles for baby, there’s still another step to consider: how to clean them. Whether you’ve chosen glass, plastic or silicone bottles, you’ll have to keep them as pristine as possible to protect baby’s developing immune system. If you listen to advice from your mother or grandmother, you might be fretting over how to sterilize baby bottles—but nowadays sterilizing baby bottles isn’t absolutely necessary, except in certain situations. “This practice is a bit outdated now that the majority of homes in developed countries use treated municipal water,” says Caitlin Hoff, a health and safety investigator for ConsumerSafety.org. “There are, however, some cases in which you might want to sterilize a bottle.” Here, we break down when sterilizing baby bottles is a good idea and the best methods for the job.
In this article:
When to sterilize baby bottles
How often to sterilize baby bottles
How to sterilize baby bottles
How to clean baby bottles
When to Sterilize Baby Bottles
Sterilizing baby bottles is an added step beyond traditional cleaning that provides extra protection against germs. And generally speaking, it’s a one-and-done deal. “When you first buy bottles, it’s important to sterilize them at least one time,” says Samira Armin, MD, a pediatrician at Texas Children’s Pediatrics. After all, you don’t know where that bottle was before it was packaged and sold to you, so an initial sterilization is a quick, easy way to ensure baby’s health and safety. “After that, it’s no longer necessary to sterilize bottles or their accessories,” she adds. “Many years ago, when water supplies weren’t reliably clean, baby items required sterilization, but nowadays this is thankfully not an issue.”
That said, there are instances when you might want to sterilize baby’s bottle beyond that first use. According to Hoff, these include:
• If you’re using borrowed or second-hand bottles. With all the gear and supplies that babies require, some moms hit up consignment shops or borrow baby bottles from a friend. In these cases, it’s critical to sterilize pre-used bottles before giving it to your child for the first time. The same goes for bottles that have been used for older siblings in your own home.
• If baby has been sick. It’s no fun when baby’s sick, so the last thing you want to do is risk re-infecting them by using unclean bottles. “If you’re concerned about any lingering germs or bacteria on your child’s bottles, sterilizing them will certainly put your mind at ease,” Hoff says.
• If baby was premature or has health issues. According to the Centers for Disease Control and Prevention (CDC), sterilization is particularly important if baby was born prematurely or has a weakened immune system.
• If you don’t have access to clean drinking water. If your home isn’t part of a municipality with clean drinking water, you use well water or you’re traveling in a country with questionable water, you may need to sterilize baby’s bottles often; once daily or even after each use would be prudent to avoid buildup of harmful microbes.
How Often to Sterilize Baby Bottles
As long as you have good quality municipal drinking water that isn’t coming from a well, it’s not necessary (or even recommended) to sterilize baby’s bottles too often. “Regular sterilization can potentially damage the bottle and allow chemicals to leach into the milk, especially if the bottle has BPA in it,” says Daniel Ganjian, MD, a pediatrician at St. John’s Health Center in Santa Monica, California. The Food and Drug Administration (FDA) banned the use of bisphenol A, or BPA, in baby bottles back in 2012 due to concerns over the chemical’s impact on infant development—but if you’re using older plastic bottles, make sure they don’t have the recycling number 7 imprinted on the bottom.
How often to sterilize baby bottles is really up to you, so do what feels right for your family. If you use a dishwasher with hot water and a heated drying cycle to clean your child’s feeding items, sanitizing baby bottles by hand isn’t called for. Otherwise, for extra germ removal beyond standard washing, the CDC says you can sanitize bottles at least once daily.
When to stop sterilizing baby bottles
If you do decide to sterilize baby’s bottles regularly, it’s okay to stop once baby is older than 3 months, according to CDC guidelines, since baby’s immune system isn’t quite so fragile anymore.
You should also stop sterilizing baby bottles and accessories if you notice any damage, Ganjian says. Glass bottles with cracks or chips should be tossed out, as should plastic bottles with splits, cracks, strong odors or any warping. Bottle nipples that have sustained noticeable wear and tear should always be replaced, since they can be a choking hazard.
How to Sterilize Baby Bottles
Sterilization kills bacteria in bottles through the use of high temperatures or chemicals, Armin says, and one method isn’t superior to another. So when it comes to deciding how to sterilize baby bottles, choose an approach that works best for you and your budget. Read on for step-by-step instructions for how to sterilize baby bottles using various techniques.
Sterilizing baby bottles with boiling water
No special equipment required here! To sterilize baby bottles using boiling water, all you need is water and a pot. And don’t worry—it’s fine to sanitize plastic bottles using this method.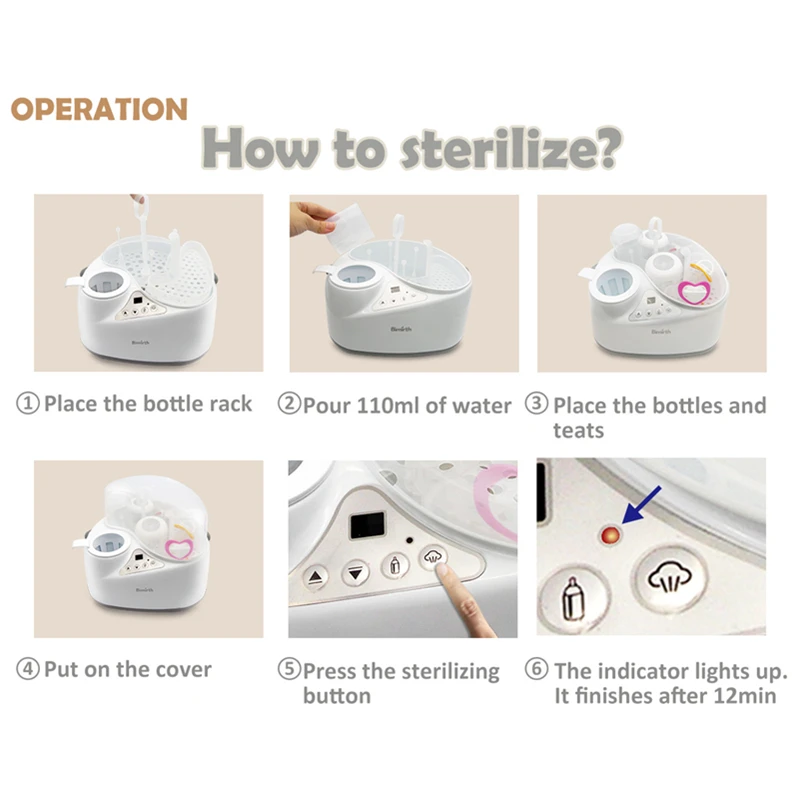
- Fill a large, clean pot with enough water to cover the bottles.
- Submerge the freshly washed bottles in the water upside down, making sure there aren’t any air bubbles at the bottom.
- Bring the water to a boil.
- Boil the bottles for five minutes (check manufacturer guidelines for variations).
- Turn the heat off and remove the bottles using tongs.
- Place them on a clean, dry dishcloth and allow them to air dry.
Sterilizing baby bottles in the microwave
Another super-easy approach to sterilizing baby bottles? Using your microwave’s steam power! Here’s how to sterilize baby bottles in the microwave without any other special equipment:
- Start with a clean microwave.
- Fill bottles about halfway with water.
- Microwave on high for one to two minutes.
- Using oven mitts, remove bottles from the microwave, dump remaining water out and let the bottles air dry.
Another option is to purchase a microwave baby bottle sterilizer.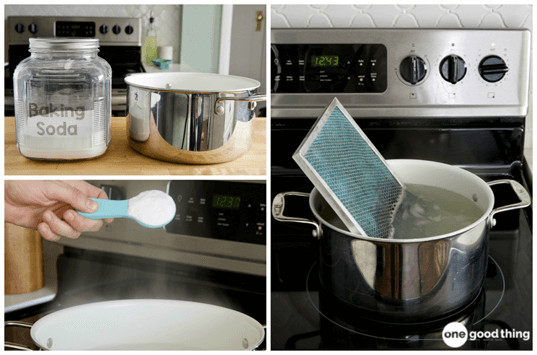 This type of sterilizer also harnesses the power of steam, but it encloses the bottles in a plastic casing to give them a more thorough cleansing. These handy sterilizers are widely available and typically cost about half as much as the better-known electric baby bottle sterilizers.
Sterilizing baby bottles with electric steam
If you know you’ll sleep easier if baby’s bottles are sterilized regularly, you may want to spring for a countertop bottle sterilizer. Steam sterilization can reach higher temperatures than boiling water, so it can kill more bacteria and mold, Ganjian says.
Though they’re a bit more pricey than any of the other options, electric baby bottle sterilizers are probably the quickest, easiest option if you want (or need) to sanitize bottles frequently. Simply follow the instructions provided by the manufacturer. Plus, they can be used to sanitize bottles, bottle parts, nipples and more. Many moms even use these for small plastic toys and teething rings once baby outgrows the bottle stage. That’s knowing how to stretch a dollar!
Sterilizing baby bottles with bleach
If you’re in a pinch and don’t have access to boiling water, steam or a dishwasher, the CDC condones the use of bleach to clean baby bottles. Here’s how to sterilize baby bottles with this method:
- Combine one teaspoon of unscented bleach with 16 cups of hot water.
- Submerge bottles in the solution, taking care to avoid any air bubbles in the bottom of the bottles.
- Soak bottles for two to five minutes, then remove with clean tongs.
- Place bottles on a clean dish towel to air dry. There’s no need to rinse, Armin says: “Any remaining bleach will break down quickly during the air-drying process and will not harm baby.”
Sterilizing baby bottles using sterilizing tablets
Wondering how to sterilize baby bottles when you’re away from home and don’t have access to your normal equipment? Food-grade, chlorine-based sterilizing tablets are just as effective at removing all the same microbes as the other sterilization techniques above. Be sure to follow the instructions on the packaging to ensure proper sterilization.
How to Clean Baby Bottles
Regardless of whether you decide to sterilize baby’s bottles, you’ll still have to thoroughly clean them after every feeding. “Newborns and infants have underdeveloped immune systems are vulnerable to infections by viruses, bacteria, parasites and fungi, which can all lead to illness. These germs can grow quickly if breast milk or formula is added to a partially used bottle that hasn’t been well cleaned,” Armin says. “Washing items thoroughly with hot water and soap is all that’s required to remove most harmful germs from bottles.” You can choose to wash bottles and their parts by hand or in the dishwasher. Here’s how:
Cleaning baby bottles in the dishwasher
Are your baby bottles dishwasher safe? Good news: Using your dishwasher’s hottest water setting and a heated drying cycle effectively sterilizes the bottles!
- Separate all bottle parts.

- Rinse the bottles and parts with clean water to remove any milk particles.
- Place all small parts (including rings, valves and nipples) in a dishwasher-safe basket to prevent them from falling to the bottom of the dishwasher.
- When possible, run the bottles on a hot-water cycle and heated drying cycle or select the sanitizing setting.
- Remove the bottles and parts from the dishwasher and allow to air dry on a clean dishcloth.
Cleaning baby bottles by hand
When cleaning by hand, the CDC recommends washing the bottles and their parts in a special container that’s only used for bottles, rather than having bottles come in contact with the sink, to prevent cross-contamination. You should also use a bottle brush or other cleaning utensil that’s set aside just for baby’s bottles.
- Start with clean hands.
- Separate the bottles and their parts and rinse each piece under running hot or cold water to remove any milk particles.
 Don’t set the bottles down in the sink.
 - Fill a clean basin with hot water and soap.
- Scrub the bottles and parts with a bottle brush, taking care to thoroughly clean all the way to the bottom of the bottle.
- Clean inside the nipples, making sure to flush water through the tiny holes at the tips.
- Rinse again under running water.
- Air dry on a clean dishcloth.
Updated February 2020
Expert bios:
As a health and safety investigator for ConsumerSafety.org, Caitlin Hoff educates families about important consumer topics that impact the general public’s health and safety. She holds a certification in CDC Health Literacy for Public Health Professionals.
Samira Armin, MD, FAAP, is a pediatrician at Texas Children’s Pediatrics. She earned her medical degree from St. George’s University in 2009 and specializes in newborns and healthy eating.
Daniel Ganjian, MD, is a pediatrician at Providence St.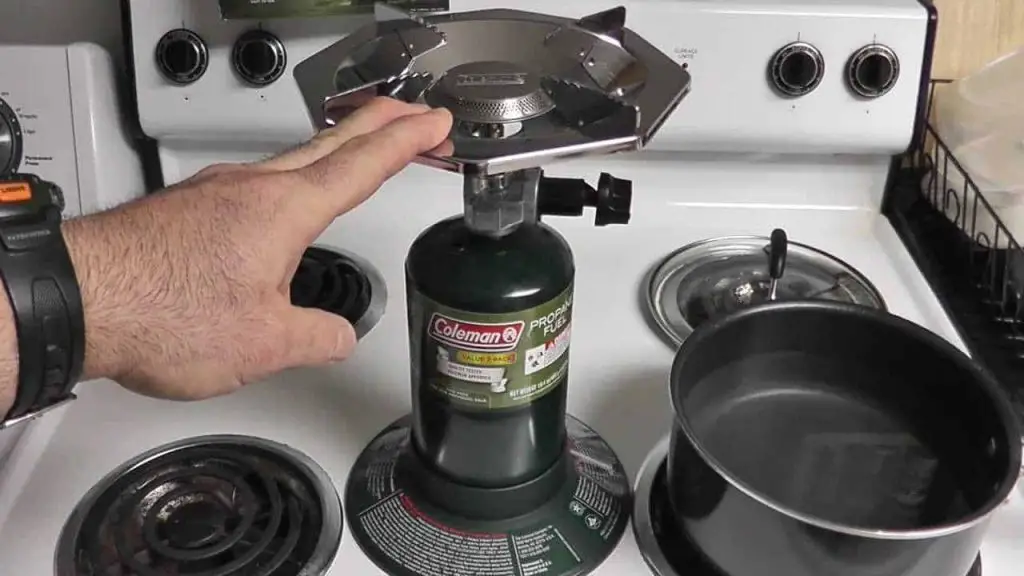 John’s Health Center in Santa Monica, California. He earned his medical degree from the University of California, Irvine, in 2004 and is a member of the Alpha Omega Alpha honor society, a designation given to just 10 percent of American physicians.
Please note: The Bump and the materials and information it contains are not intended to, and do not constitute, medical or other health advice or diagnosis and should not be used as such. You should always consult with a qualified physician or health professional about your specific circumstances.
Plus, more from The Bump:
16 Best Baby Bottles
How Much Should a Newborn Eat?
Pumping Breast Milk 101
Cleaning and sterilising baby bottles
Cleaning and sterilising baby bottles | Pregnancy Birth and Baby beginning of content4-minute read
Listen
It’s essential to properly wash and sterilise the feeding equipment when you’re bottle feeding. You'll need to clean and sterilise each bottle, teat and screw cap after every feed. It’s important that you continue sterilising everything until your baby is 12 months' old.
Why is it important to clean and sterilise my baby’s bottles?
Babies have immature immune systems so they aren’t strong enough to fight off a range of infections. One important way to support them in staying healthy is to reduce the chances of their getting sick in the first place.
Milk is the perfect medium in which bacteria can grow. This is why it’s important to sterilise all feeding equipment and keep formula cold until just before feeding your baby.
What equipment needs cleaning and how often?
You need to clean and sterilise all bottle parts, teats and screw caps.
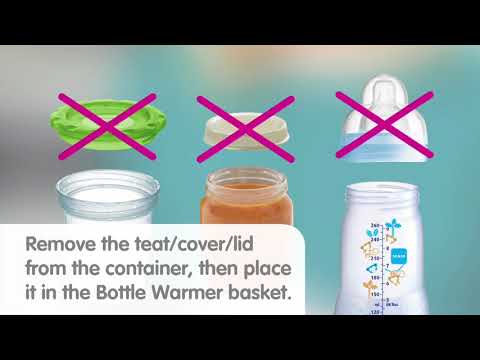
- Separate all parts of the bottle and pull the teat out of its screw cap.
- Use hot water and dishwashing detergent.
- Clean all areas of the bottle with a bottle brush, including the thread where the cap screws on.
- Remove any milk still sitting in the teat or the hole with a teat brush.
- Squeeze hot, soapy water through the teat hole, then do the same with clean water to rinse the teat.
- Make sure to rinse the bottles and equipment well.
Get a new bottle brush once the bristles are worn. They need to be stiff enough to remove all the milky residue from the inside of the bottle.
How to sterilise feeding equipment
Even if bottles and teats look clean, they might still carry germs to your baby so it’s essential to sterilise your feeding equipment properly.
There are 3 ways to do this: boiling, steam sterilisation and chemical sterilisation.
If you’re breastfeeding and only need to sterilise a bottle occasionally, the boiling method may be good enough. It’s also cheaper than buying a steam steriliser. If you’re expressing and/or bottle feeding, then a steam steriliser might be the best option.
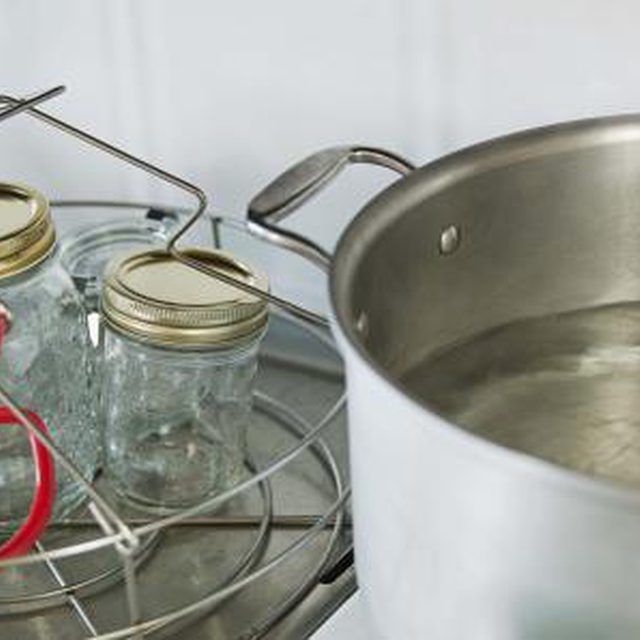
The boiling method
- Put all parts of the cleaned bottle, including teats, in a large saucepan.
- Cover the equipment with tap water.
- Make sure all air bubbles are out of the bottles and that they are fully submerged under the water.
- Bring the water to the boil.
- Boil for 5 minutes.
- Let the feeding equipment cool in the saucepan before taking it out.
- Place all the feeding equipment in a clean container and put it in the fridge. Make sure the container is covered firmly with a lid.
- You can store everything in the fridge for up to 24 hours.
The steam sterilisation method
Steam sterilisers are popular because they work quickly, are cheap to use and are very effective. They heat water to boiling point and the steam kills the bacteria. Some steam sterilisers are designed to operate in a microwave.
- Place the clean bottles and feeding equipment in the steriliser.
- Make sure there’s enough room between each bottle, teat and screw cap for the steam to circulate around all surfaces.
- Follow the manufacturer’s directions about how much water to add.
- Turn on and push the button to start. If you’re using a microwave steriliser, place the steriliser in the microwave and turn on for the correct time.
- Wait until the sterilisation cycle has finished and the light goes off.
- Store all sterilised feeding equipment in a clean, lidded container in the fridge.
- Sterilise all equipment again if you haven’t used it within 24 hours.
The chemical sterilisation method
Be careful when using chemical sterilisation. Many methods use bleach, which can also bleach clothing and surfaces, and irritate the skin, if spilt.
Antibacterial chemical sterilisation solutions are available in liquid and tablet form. They need to be prepared exactly as directed on the container.
- Make sure you have a container that’s large enough to hold your baby’s bottles and feeding equipment.
- Use the recommended amount of tap water to prepare the sterilising solution.
- Submerge all bottles and feeding equipment in the solution.
 Make sure there are no bubbles left in the bottles.
 - Leave the equipment in the solution for the recommended time – there’s no need to rinse the solution off after sterilisation.
- Throw out the solution after 24 hours and wash out the container before preparing a new batch.
Wash your hands before handling sterilised feeding equipment
Make sure you wash and dry your hands before you handle sterilised bottles and teats. It’s easy to contaminate equipment just by touching it with unclean hands.
Sources:
Child and Youth Health (Feeding your baby), Raising Children Network (Bottle feeding: cleaning and sterilising equipment), Karitane (Bottle Feeding)Learn more here about the development and quality assurance of healthdirect content.
Last reviewed: September 2021
Back To Top
Related pages
- Expressing and storing breast milk
- Making formula – dos and don'ts
- Feeding your baby with formula
- Breastfeeding your baby
Need more information?
Bottle-feeding: cleaning & sterilising | Raising Children Network
Bottle-feeding your baby? Find out what equipment you need – bottles, teats, rings and caps – plus how to clean and sterilise it all.
Read more on raisingchildren.net.au website
Baby formula & bottle-feeding for babies | Raising Children Network
Baby formula is the only safe alternative to breastmilk for the first 12 months. All Australian cow’s milk-based formulas meet strict standards. Read more.
Read more on raisingchildren.net.au website
Breastmilk & breastfeeding: benefits | Raising Children Network
Breastmilk – designed by nature for human babies. Breastmilk and breastfeeding have many health and practical benefits for mothers and babies. Read more.
Read more on raisingchildren.net.au website
Feeding your baby with formula
Learn about formula feeding for your baby, how is it different to breastmilk, why formula feed and what do if your baby is allergic to formula.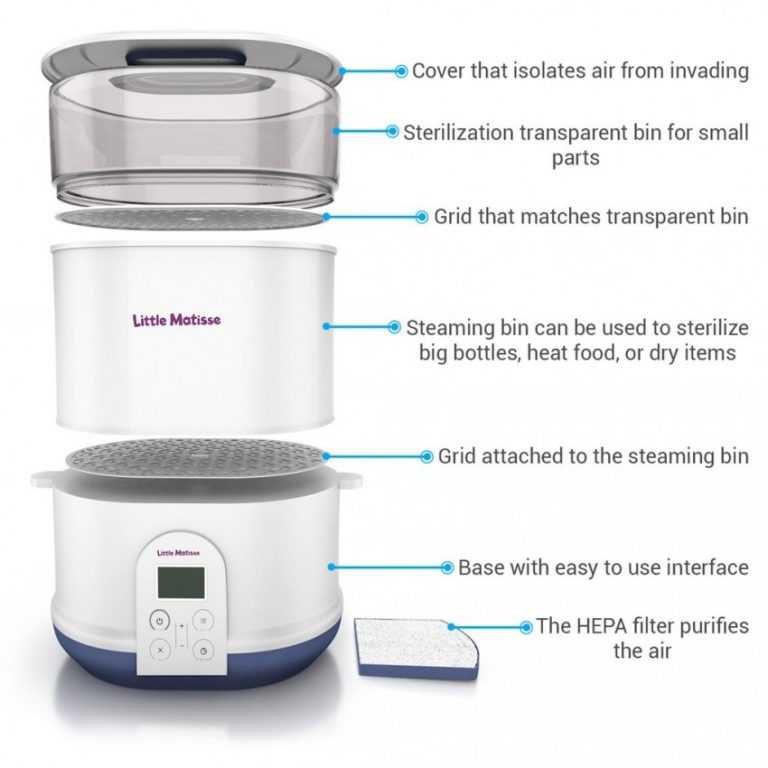
Read more on Pregnancy, Birth & Baby website
Dummies: advantages, disadvantages & tips | Raising Children Network
Dummies soothe some babies and help them settle. But dummies can be a hard habit to break, and babies also need help to manage them. Get tips for dummy use.
Read more on raisingchildren.net.au website
Expressing breastmilk & storing breastmilk | Raising Children Network
You can express breastmilk by hand, or with a manual or an electric pump. Store expressed breastmilk in special bags or containers in the fridge or freezer.
Read more on raisingchildren.net.au website
Disclaimer
Pregnancy, Birth and Baby is not responsible for the content and advertising on the external website you are now entering.
Need further advice or guidance from our maternal child health nurses?
1800 882 436
Video call
- Contact us
- About us
- A-Z topics
- Symptom Checker
- Service Finder
- Linking to us
- Information partners
- Terms of use
- Privacy
Pregnancy, Birth and Baby is funded by the Australian Government and operated by Healthdirect Australia.
Pregnancy, Birth and Baby is provided on behalf of the Department of Health
Pregnancy, Birth and Baby’s information and advice are developed and managed within a rigorous clinical governance framework. This website is certified by the Health On The Net (HON) foundation, the standard for trustworthy health information.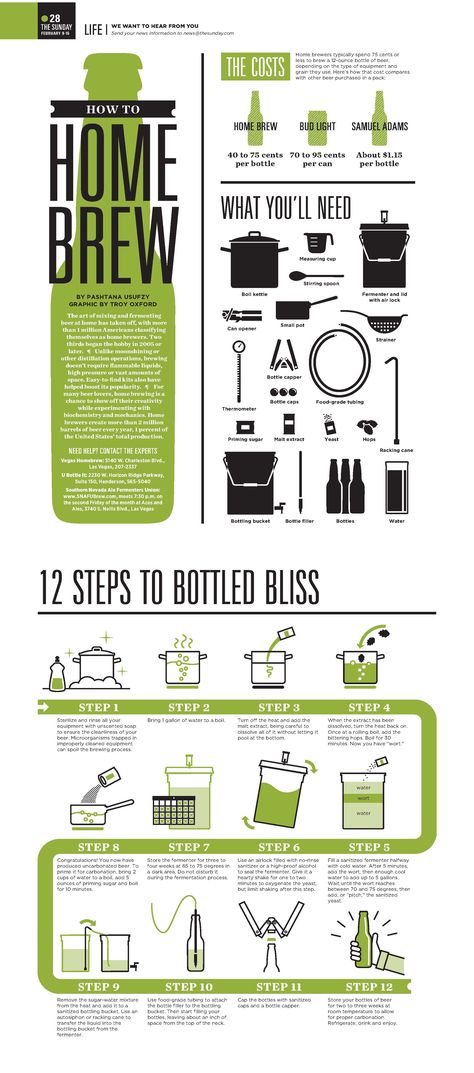
This site is protected by reCAPTCHA and the Google Privacy Policy and Terms of Service apply.
This information is for your general information and use only and is not intended to be used as medical advice and should not be used to diagnose, treat, cure or prevent any medical condition, nor should it be used for therapeutic purposes.
The information is not a substitute for independent professional advice and should not be used as an alternative to professional health care. If you have a particular medical problem, please consult a healthcare professional.
Except as permitted under the Copyright Act 1968, this publication or any part of it may not be reproduced, altered, adapted, stored and/or distributed in any form or by any means without the prior written permission of Healthdirect Australia.
Support this browser is being discontinued for Pregnancy, Birth and Baby
Support for this browser is being discontinued for this site
- Internet Explorer 11 and lower
We currently support Microsoft Edge, Chrome, Firefox and Safari. For more information, please visit the links below:
- Chrome by Google
- Firefox by Mozilla
- Microsoft Edge
- Safari by Apple
You are welcome to continue browsing this site with this browser. Some features, tools or interaction may not work correctly.
HOW TO STERILIZE PHILIPS AVENT BOTTLES
Teats and bottles harbor millions of microbes. They are not afraid of boiling water, soda and detergents. The only thing that kills them is hot steam, which literally dissolves bacilli with a probability of up to 99.9%. Porridge and milk keep longer. A formula-fed baby is less likely to get sick.
So, mums, end your feeding with poorly washed bottles and learn how to disinfect them the way our grandmothers did. Only in a new way. nine0003
How to sterilize baby bottles
Washing with a brush or sponge is a must after every feeding. And it is better to sterilize in the evening or in the morning, in order to get rid of all pathogenic bacteria and not worry about the cleanliness of children's accessories.
When doing this, you must follow the safety rules: otherwise you can inadvertently scald or deform plastic dishes.
Below are three general guidelines for sterilizing baby bottles. nine0003
- The utensil must not be immersed in boiling water, otherwise it will soften and melt.
- Glasses and bottles are placed with their neck down: so that the steam cleans the inside, and the condensate flows down the walls into a bowl.
- Bottles must not touch the sides of the pan as they may melt and stick to them.
After sterilization, it is better not to remove the dishes from the container for about ten minutes. It should cool down to a comfortable temperature. And if you really need it, you should use tongs, oven mitts or a kitchen towel folded in several layers. nine0003
By the way: Baby utensils: how to choose - 4 key parameters to help
How to sterilize pacifiers for babies?
Teats are sterilized in the same way as bottles, but with the base down - to steam not only the outer, but also the inner walls. And let the moisture drain.
Types of sterilization
Two types of sterilization are used for the treatment of children's utensils - steam and dry heat.
- In the first case, the vessel is steamed. nine0020
- In the second - washed and still wet bottles are heated in the oven, sterilizer, microwave, multicooker and even in the dishwasher, which supports steam treatment at 80+ ° C.
Life hack: how to steam bottles and other things with sterilization bags (such as Nuvita NV1087)
- Put dishes in food bags.
- Pour 60-70 ml of water into them.
- Microwave for 2-3 minutes.
The sterilization process is as simple as a copper penny. Evaporating moisture destroys pathogenic (and not only) microbes from various surfaces. Materials exposed to hot air and steam do not creak from cleanliness, but are sterile and safe for health.
In this way, not only nipples and bottles are disinfected, but also brushes, bowls, thermoses and cups like Avent SCF796/01 and so on.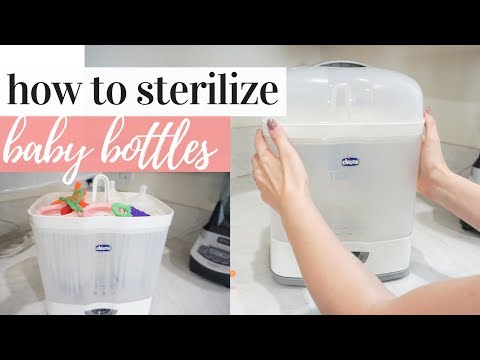
Interesting article: When did the first baby stroller appear: 10 facts from history
Microwaveable
The microwave oven offers 3 sterilization options. Not all of them are suitable for processing nipples.
- Place the bottles in a glass or ceramic dish → fill it with water → cover with a lid → put the microwave on maximum power for 5-7 minutes.
- Pour water into the bottle 1-1.5 cm from the bottom → microwave for 3-5 minutes. The nipples will have to be washed separately.
- In the Nuvita type microwave sterilizer (NV1085), it is enough to put the container → pour water → click on the valve → set the device to work for 5-8 minutes. nine0020
Picking up a hot dish is easier with tongs or oven mitts.
Sterilization in the microwave gives its advantages and disadvantages, described in the table: the inner bowl of the multicooker. So that the saucepan does not smell like food, otherwise bottles or children's dishes will take over this smell.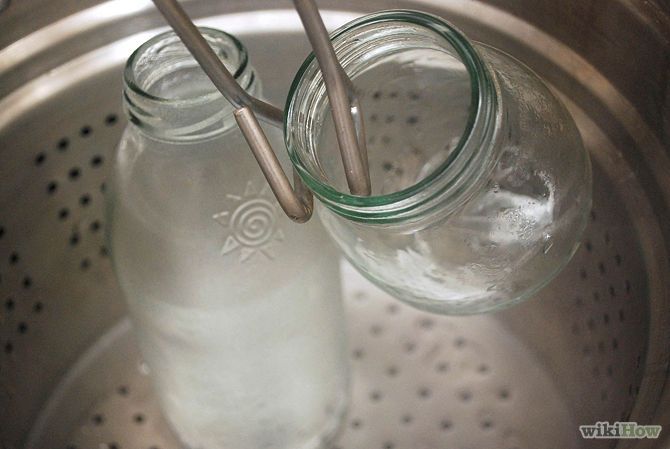 nine0003
The subsequent sterilization process in the multicooker is similar to microwave.
- Pour ≈ 1-1.5 liters of water into the bowl.
- Place the steam rack and place the bottles upside down.
- Seal the steam device hermetically.
- Set "Steam" mode to 15 minutes or "Sterilize" mode.
- Remove the dishes and cover with a towel to cool completely.
This method also has its pros and cons. nine0003
Sterilizer
Children's sterilizer is an electrical device for processing utensils. Works carefully, the bottle will not crack due to overheating.
Everything is calculated with medical precision in the method of steaming with a sterilizer. The device holds up to 6-8 bottles and the same number of nipples. A great example of such a device is the Philips Avent 3-in-1 steam sterilizer. It is ideal for a family with several kids.
How the device works is as simple as it gets. It consists of step by step actions. nine0003
- Pour cold water into the tank (how much is indicated in the instructions).
- Place pre-cleaned bottles in special niches. This should be done upside down.
- Close cover.
- Switch on the sterilizer for 7-15 minutes.
- Let the device “cool down” for 5-7 minutes. This is necessary so that you do not accidentally burn yourself with steam.
If the use of the bottles "does not burn", then they can be left under a closed lid - so they will be sterile for another 4-5 hours. If you need to get one of the bottles, take only it, and close the rest of the clean bottles with lids. nine0003
Before putting the dishes into the sterilizer, make sure they are clean. The device removes germs and odor, but does not cope with pollution.
Read: Top 5 Best Convertible Strollers
Avoid Sterilization Mistakes: 4 Common
Many parents make basic mistakes that are best addressed in advance.
1. Unwashed or poorly washed utensils
Leftover food provokes the reproduction of microflora and can cause stomach problems in a child. And sterilization does not wash out food residues - only cleaning can do this. nine0003
2. Pot boiling
You can't boil! The maximum allowable temperature for children's utensils is 110 ° C. And often it is even less. Otherwise, the bottles may melt.
3. Installation in a steamer and microwave without water is contraindicated
The device will burn, and the dishes will melt.
4. Sterilization of dishes with visible chips and cracks
Microbes accumulate and multiply in them, which can cause diseases of the gastrointestinal tract and not only. nine0003
Note: TOP-10 strollers with inflatable wheels
Pros and cons of sterilization
Each parent has his own opinion about sterilization, but there are definitely no indifferent to this issue.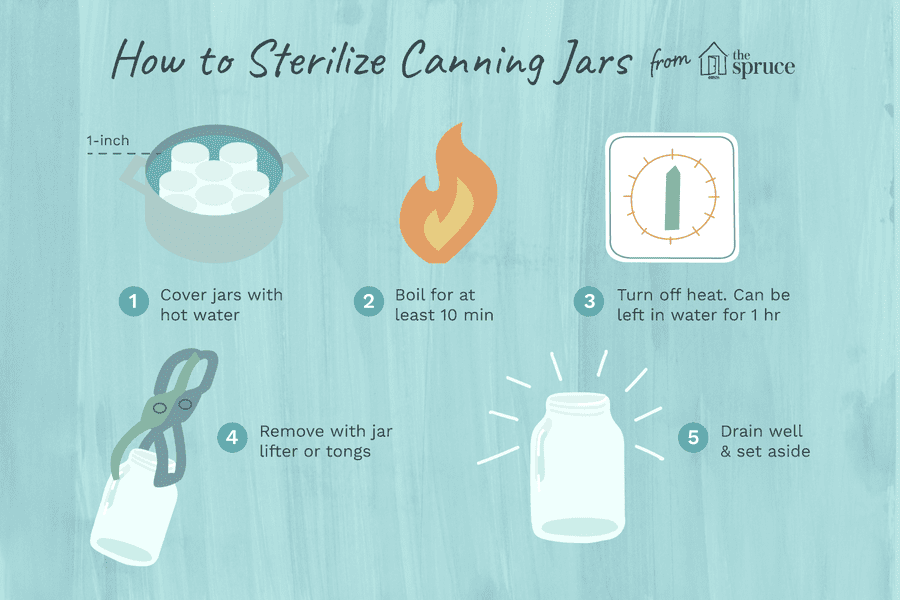
Arguments "For" and "Against" are summarized in the final table:
So when choosing "to sterilize or not", everyone decides for himself. However, if the child is often fed in public places where it is impossible to verify the cleanliness of the surfaces, it is advisable to at least wash the dishes thoroughly in very hot water. nine0003
Read: TOP-5 three-wheeled strollers 9,0003
How to sterilize bottles for newborns and how to do it in a pot
To complain

