Use parental controls on your child's iPhone, iPad, and iPod touch
With Content & Privacy Restrictions in Screen Time, you can block or limit specific apps and features on your child's device. You can also restrict the settings on your iPhone, iPad, or iPod touch for explicit content, purchases and downloads, and privacy.
Set Content & Privacy Restrictions
Prevent iTunes & App Store purchases
Allow built-in apps and features
Prevent explicit content and content ratings
Prevent web content
Restrict Siri web search
Restrict Game Center
Allow changes to privacy settings
Allow changes to other settings and features
Set Content & Privacy Restrictions
Go to Settings and tap Screen Time.
Tap Turn on Screen Time, then tap it again. Choose "This is My [Device]" or "This is My Child's [Device]. "
If you're the parent or guardian of your device and want to prevent another family member from changing your settings, tap Use Screen Time Passcode to create a passcode, then re-enter the passcode to confirm. After you confirm your passcode you'll be asked to enter your Apple ID and password. This can be used to reset your Screen Time passcode if you forget it.
If you're setting up Screen Time on your child's device, follow the prompts until you get to Screen Time Passcode and enter a passcode. Re-enter the passcode to confirm. After you confirm your passcode you'll be asked to enter your Apple ID and password. This can be used to reset your Screen Time passcode if you forget it.
Tap Content & Privacy Restrictions. If asked, enter your passcode, then turn on Content & Privacy Restrictions.
Make sure to choose a passcode that's different from the passcode that you use to unlock your device. To change or turn off the passcode on your child's device, tap Settings > Screen Time > [your child's name]. Then tap Change Screen Time Passcode or Turn Off Screen Time Passcode, and authenticate the change with Face ID, Touch ID, or your device passcode.
With iOS 16, while you're setting up Screen Time for a child's device, you can set age-related restrictions for content in apps, books, TV shows, and movies. Just follow the onscreen instructions during setup.
If you forgot your Screen Time passcode, update your device to the latest iOS or iPadOS then reset your passcode. If you can’t update your device, erase it and set it up as new to remove the passcode and choose a new one. Restoring your device from a backup won't remove your passcode.
Prevent iTunes & App Store purchases
You can also prevent your child from being able to install or delete apps, make in-app purchases, and more. To prevent iTunes & App Store purchases or downloads:
Go to Settings and tap Screen Time.
Tap Content & Privacy Restrictions. If asked, enter your passcode.
Tap iTunes & App Store Purchases.
Choose a setting and set to Don't Allow.
You can also change your password settings for additional purchases from the iTunes & App Store or Book Store. Follow steps 1-3, then choose Always Require or Don't Require.
Allow built-in apps and features
You can restrict the use of built-in apps or features. If you turn off an app or feature, the app or feature won't be deleted, it's just temporarily hidden from your Home Screen. For example, if you turn off Mail, the Mail app won't appear on your Home Screen until you turn it back on.
To change your Allowed Apps:
Go to Settings and tap Screen Time.
Tap Content & Privacy Restrictions.
Enter your Screen Time passcode.
Tap Allowed Apps.
Select the apps that you want to allow.
Prevent explicit content and content ratings
You can also prevent the playback of music with explicit content and movies or TV shows with specific ratings. Apps also have ratings that can be configured using content restrictions.
To restrict explicit content and content ratings:
Go to Settings and tap Screen Time.
Tap Content & Privacy Restrictions, then tap Content Restrictions.
Choose the settings that you want for each feature or setting under Allowed Store Content.
Here are the types of content that you can restrict:
Music, Podcasts, News, Fitness: Prevent the playback of music, music videos, podcasts, news, and workouts containing explicit content
Music Videos: Prevent finding and viewing music videos
Music Profiles: Prevent sharing what you're listening to with friends and seeing what they're listening to
Movies: Prevent movies with specific ratings
TV Shows: Prevent TV shows with specific ratings
Books: Prevent content with specific ratings
Apps: Prevent apps with specific ratings
App Clips: Prevent app clips with specific ratings
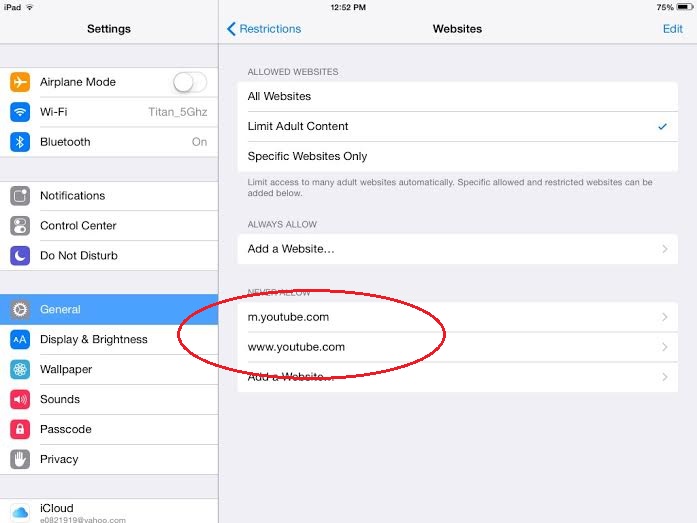
Prevent web content
iOS and iPadOS can automatically filter website content to limit access to adult content in Safari and other apps on your device. You can also add specific websites to an approved or blocked list, or you can limit access to only approved websites. Follow these steps:
Go to Settings and tap Screen Time.
Tap Content & Privacy Restrictions and enter your Screen Time passcode.
Tap Content Restrictions, then tap Web Content.
Choose Unrestricted Access, Limit Adult Websites, or Allowed Websites.
Depending on the access you allow, you might need to add information, like the website that you want to restrict.
Restrict Siri web search
To restrict Siri features:
Go to Settings and tap Screen Time.
Tap Content & Privacy Restrictions, then tap Content Restrictions.
Scroll down to Siri, then choose your settings.
You can restrict these Siri features:
Web Search Content: Prevent Siri from searching the web when you ask a question
Explicit Language: Prevent Siri from displaying explicit language
Restrict Game Center
To restrict Game Center features:
Go to Settings and tap Screen Time.
Tap Content & Privacy Restrictions, then tap Content Restrictions.
Scroll down to Game Center, then choose your settings.
You can restrict these Game Center features:
Multiplayer Games: Prevent the ability to play multiplayer games with everyone, allow with friends only, or allow with anyone
Adding Friends: Prevent the ability to add friends to Game Center
Connect with Friends: Prevent the ability to share a Game Center friend list with third-party games
Screen Recording: Prevent the ability to capture the screen and sound
Nearby Multiplayer: Prevent the ability to enable the nearby setting
Private Messaging: Prevent the ability to voice chat or send or receive custom messages with game and friend invitations
Profile Privacy Changes: Prevent the ability to change profile privacy settings
Avatar & Nickname Changes: Prevent the ability to change Game Center avatars and nicknames
Allow changes to privacy settings
The privacy settings on your device give you control over which apps have access to information stored on your device or the hardware features. For example, you can allow a social-networking app to request access to use the camera, which allows you to take and upload pictures.
To allow changes to privacy settings:
Go to Settings and tap Screen Time.
Tap Content & Privacy Restrictions. If asked, enter your passcode.
Tap Under Privacy, then choose the settings that you want to restrict.
Here are the things you can restrict:
Location Services: Lock the settings to allow apps and websites to use location
Contacts: Prevent apps from accessing your Contacts
Calendars: Prevent apps from accessing your Calendar
Reminders: Prevent apps from accessing your Reminders
Photos: Prevent apps from requesting access to your photos
Share My Location: Lock the settings for location sharing in Messages and Find My Friends
Bluetooth sharing: Prevent devices and apps from sharing data through Bluetooth
Microphone: Prevent apps from requesting access to your microphone
Speech Recognition: Prevent apps from accessing Speech Recognition or Dictation
Apple Advertising: Prevent changes to advertising settings
Allow Apps to Request to Track: Prevent tracking activity by apps that you've denied access to
Media & Apple Music: Prevent apps from accessing your photos, videos, or music library
Allow changes to other settings and features
You can allow changes to other settings and features, the same way you can allow changes to privacy settings.
Go to Settings and tap Screen Time.
Tap Content & Privacy Restrictions. If asked, enter your passcode.
Under Allow Changes, select the features or settings that you want to allow changes to and choose Allow or Don't Allow.
Here are some features and settings that you can allow changes for:
Passcode Changes: Prevent changes to your passcode
Account Changes: Prevent account changes in Accounts & Passwords
Cellular Data Changes: Prevent changes to cellular data settings
Reduce Loud Sounds: Prevent changes to volume settings for safe listening
Driving Focus: Prevent changes to the Driving Focus
TV Provider: Prevent changes to TV provider settings
Background App Activities: Prevent changes to whether or not apps run in the background
Information about products not manufactured by Apple, or independent websites not controlled or tested by Apple, is provided without recommendation or endorsement. Apple assumes no responsibility with regard to the selection, performance, or use of third-party websites or products. Apple makes no representations regarding third-party website accuracy or reliability. Contact the vendor for additional information.
Published Date:
How to Set Parental Controls on Your Child's iPhone or iPad
iPhone parental controls can keep your child away from sensitive content and regulate screen time.
You can also control purchases and set content and privacy restrictions.
Parental controls can all be accessed via the Screen Time section of your Settings app.
When it comes to keeping your kids safe, technology is an important consideration. If you have Apple devices, including iPhones and iPads, in the house, you have access to a robust set of resources for controlling what your kids can do on their own devices. You just have to know how to set them up.
Here's what you'll need to do.
Set content and privacy restrictions using Screen Time
Before you can start, you must have Screen Time for Family set up on your device.
1. Open the Settings app on your iPhone or iPad.
2. Tap Screen Time.
In Settings, go to "Screen Time." Devon Delfino
3. Tap Turn on Screen Time.
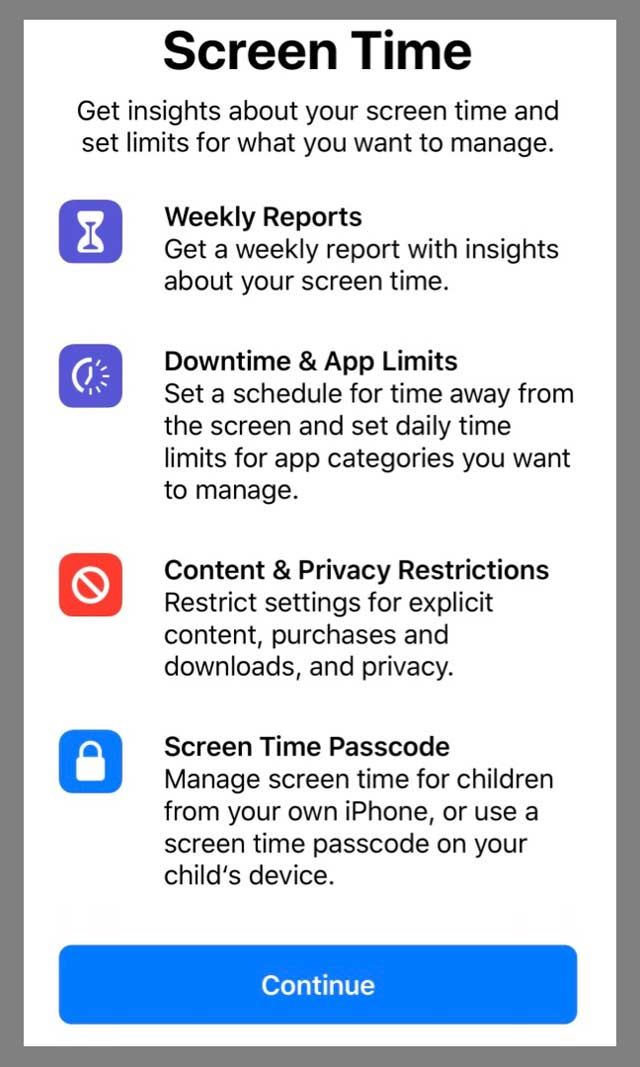
4. After reading a summary of what the Screen Time feature can offer, tap Continue.
5. If you're setting up parental controls on your kid's iPhone, select This is My Child'siPhone.
Select who's phone you're using at the bottom. Devon Delfino
6. Tap Downtime, then configure the hours you want your kid's iPhone to be offline. For example, you might want to prevent them from playing games or using social media after dinner. Regardless of what hours you choose, calls and text messages will still get through.
From the Screen Time page, select "Downtime. " Devon Delfino
7. Tap the back button, then select App Limits. From there, you can choose how long your child can use various kinds of apps. For example, you can limit social media apps and games to two hours a day, then tap Set App Limit.
In "App Limits," you can set a time limit for certain apps. Devon Delfino
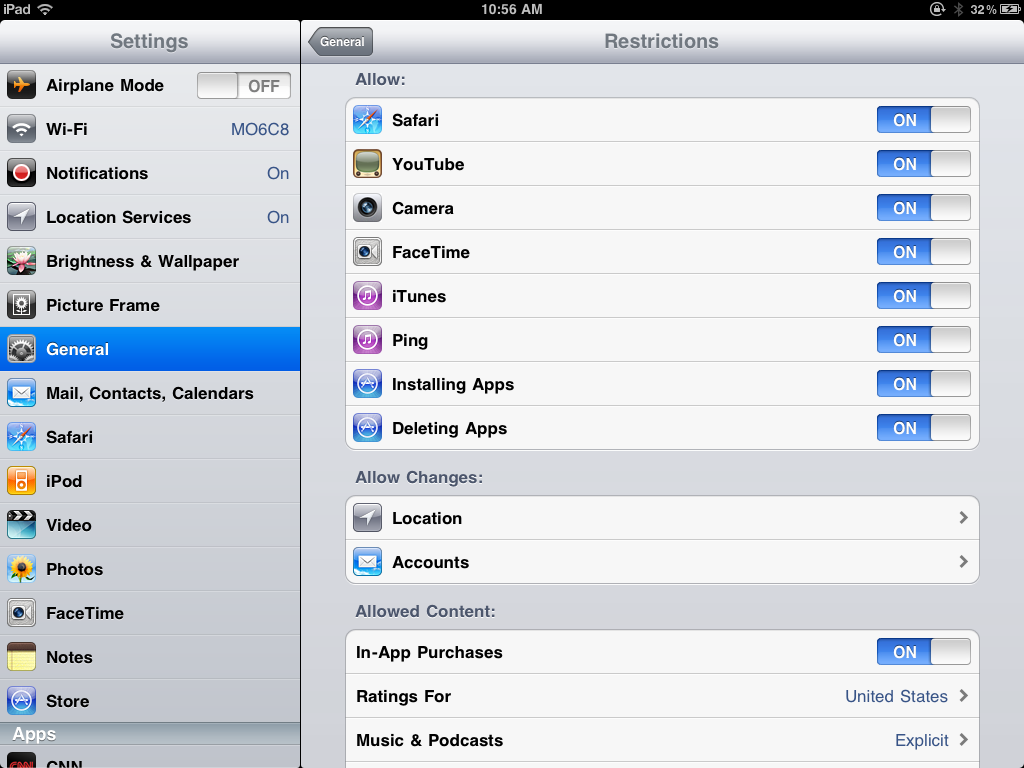
8. Tap the back button again and select Content & Privacy Restrictions. Then toggle on the Content & Privacy Restrictions option and create a passcode so that you have access to the Screen Time parental controls, but your child does not.
Toggle on the button at the top of the page. Devon Delfino
Quick tip: To prevent your child from changing your settings, select Use Screen Time Passcode to create a passcode, and re-enter it as directed to confirm your decision. If you have iOS 13.4 and later, you'll then be asked to enter your Apple ID and password.
Control iTunes and App Store purchasesPrevent purchases and downloads
1. Open the Settings app on your iPhone or iPad.
2. Tap Screen Time.
3. Select Content & Privacy Restrictions. You might be asked to enter your passcode at this point.
Go to "Content & Privacy Restrictions." Devon Delfino
4. Tap iTunes & App Store Purchases.
Select "iTunes & App Store Purchases." Devon Delfino
5. Choose Don't Allow where desired.
Enable 'Ask to Buy'
This process must be done on your device — not your child's device. Once set up, you, acting as the family organizer, are able to approve or deny requests from your child to make purchases, like buying a new app for their phone.
1. Open your Settings app.
2. Select your name at the top of the screen.
3. Tap Family Sharing.
Go to "Family Sharing." Devon Delfino
4. Select Ask to Buy.
On the Family Sharing page, select "Ask To Buy. " Devon Delfino
5. Tap the name of your desired family member.
6. Use the toggle button to turn on or turn off Ask to Buy.
Note: Ask to Buy doesn't work for apps or other content distributed by their school if your child's account was set up using Apple ID for students. However, it will still work for personal purchases.
Specify which websites your child is allowed to visit
1. Open the Settings app and then tap Screen Time.
2. On the Screen Time page, tap Content & Privacy Restrictions. You might need to enter your Screen Time passcode.
3. If it's not already turned on, swipe the button for Content & Privacy Restrictions to the right.
4. Tap Content Restrictions.
Select "Content Restrictions." Devon Delfino
5. In the Web Content section, tap Web Content.
From the Content Restrictions page, go to "Web Content." Devon Delfino
6. Depending on how restrictive you want to be, tap Limit Adult Websites or Allowed Websites Only. Once you make that selection, you can fine-tune the controls by adding websites to the list of allowed (or not allowed) sites.
Prevent explicit content
1. Go into your Settings app.
2. Tap Screen Time.
3. Tap Content & Privacy Restrictions.
Go to "Content & Privacy Restrictions." Devon Delfino
4. Select Content Restrictions.
5. Choose the settings you want.
Choose what content you'd like to restrict or allow. Devon Delfino
From this screen, you can restrict:
Ability to play music, music videos, podcasts, and news containing explicit content.
Ability to find and view music videos.
Ability to share what they're listening to with friends, and see what their friends are listening to.
Movies, TV shows, book content and apps with specific ratings.
Quick tip: You can select the country or region in the ratings section to apply your desired content ratings for that entire region.
Disable built-in apps
1. Go into your Settings app and tap Screen Time.
2. Select Content & Privacy Restrictions.
3. Enter your Screen Time passcode, as directed.
4. Select Allowed Apps.
From the Content & Privacy Restrictions page, go to "Allowed Apps." Devon Delfino
5. Toggle off the apps that you want to disable.
Note: Disabling these apps doesn't delete them, it simply hides them from your child's home screen.
Restrict Siri web searches
1. Go into your Settings app.
2. Tap Screen Time.
3. Select Content & Privacy Restrictions.
4. Tap Content Restrictions.
5. Scroll down to Siri, then choose your settings. You can prevent Siri from searching the web when you ask a question, and prevent Siri from displaying any explicit language from within this setting.
In the Siri section, choose what kind of content you want to allow. Devon Delfino
Devon Delfino
Devon Delfino is a Brooklyn-based freelance journalist specializing in personal finance, culture, politics, and identity. Her work has been featured in publications such as The Los Angeles Times, Teen Vogue, Business Insider, and CNBC. Follow her on Twitter at @devondelfino.
Read moreRead less
Dave Johnson
Freelance Writer
Dave Johnson is a technology journalist who writes about consumer tech and how the industry is transforming the speculative world of science fiction into modern-day real life. Dave grew up in New Jersey before entering the Air Force to operate satellites, teach space operations, and do space launch planning. He then spent eight years as a content lead on the Windows team at Microsoft. As a photographer, Dave has photographed wolves in their natural environment; he's also a scuba instructor and co-host of several podcasts. Dave is the author of more than two dozen books and has contributed to many sites and publications including CNET, Forbes, PC World, How To Geek, and Insider.
Read moreRead less
CSS3 | Pseudo-classes of child elements
Last updated: 04/21/2016
:last-child: represents the element that is the last child of the element
:only-child: represents an element that is the only child in some container
:only-of-type: selects an element that is the only element of a certain type (tag) in some container
:nth-child(n): represents a child that has a specific number n, such as the second child
:nth-last-child(n): represents the child element that has a specific number n, starting at the end
:nth-of-type(n): selects a child of a specific type that has a specific number
:nth-last-of-type(n): selects a child element of a specific type that has a specific number, starting at the end
Pseudo-class first-child
Use the pseudo-class first-child to select the first links in blocks:
The selector a:last-child defines the style for links that are the last children.
In the first block, just the last child element is a link. But in the second, the last child element is a paragraph, so in In the second block, the style is not applied to any of the links.
only-child selector
The :only-child selector selects elements that are the only children in containers:
Selectors in CSS3
Header
Text1
Text2
Text3
Text4
The paragraphs with the texts "Text1" and "Text4" are the only children in their outer containers, so they are styled with a red font color.
The only-of-type pseudo-class
The only-of-type pseudo-class selects an element that is the only element of a particular type in the container. For example, a single div element, while elements of other types in the same container can be as many as you like.
Selectors in CSS3
header
Single paragraph and span element
footer
Even though the style is defined for the div elements, it will not be applied because there are two div elements in the body container instead of one. But in body there is only one p element, so it will get styled. And also there is only one span element in the p container, so it will be styled as well.
The nth-child pseudo-class
The nth-child pseudo-class allows you to style every second, third element, only even or only odd elements, etc.
For example, stylizing even and odd table rows:
Selectors in CSS3
Smartphones
Samsung
Galaxy S7 Edge
60000
Apple
iPhone SE
39000
Microsoft
Lumia 650
13500
Alcatel
Idol S4
30000
Huawei
P9
60000
HTC
HTC 10
50000
Meizu
Pro 6
40000
Xiaomi
Mi5
35000
To style odd elements, "odd" is passed to the selector:
tr:nth-child(odd){}
To style even elements, "even" is passed to the selector: (even){}
We can also pass the number of the element being styled to this selector:
tr:nth-child(3) { background-color: #bbb; }
In this case, the third line is being styled.
Another possibility is to use a substitute for a number that is expressed by the letter n:
tr:nth-child(2n+1) { background-color: #bbb; }
Here the style is applied to every second odd line.
The number before n (in this case 2) represents which child element will be selected next. The number that comes after the plus sign indicate which element to start selection from, i.e. +1 means to start from the first child element.
Thus, in this case, the selection starts with the 1st element, and the next selection is 2 * 1 + 1 = 3rd element, then 2 * 2 + 1 = 5th element, and so on.
For example, if we wanted to select every third element, starting with the second, we could write:
tr:nth-child(3n+2) { background-color: #bbb; }
The :nth-last-child pseudo-class essentially provides the same functionality, only the elements are counted from the beginning, not from the end:
tr:nth-last-child(2) { background-color: #bbb; /* 2nd line from the end, i. e. penultimate */ } tr:nth-last-child(2n+1) { background-color: #eee; /* odd lines starting from the end */ }
Pseudo-class nth-of-type
Pseudo-class :nth-of-type allows you to select a child element of a certain type by a certain number:
tr:nth-of-type(2) { background-color: #bbb; }
The nth-last-of-type pseudo-class works similarly, only now the elements are counted from the end:
To enter the Mail.ru mailbox through the mail program on the iPhone and iPad, the usual mailbox password will not work - you will need a special password for the external application. To create such a password, go to Mail on desktop → "Security" → "Passwords for external apps", or follow the link if you use Mail on a mobile browser. You cannot create such a password in the Mail mobile app.
The security of the mail application pre-installed on your iPhone and iPad can only be guaranteed for iOS 10 or later. If you have iOS 9 or below, it's not safe to use the pre-installed mail app. We recommend updating iOS.
Set up via IMAP
Open the default Mail app on your iPhone or iPad.
Select "Other".
3. Fill in the fields:
Name
The name that will be displayed in the "From:" field for all sent messages
 Then tap Change Screen Time Passcode or Turn Off Screen Time Passcode, and authenticate the change with Face ID, Touch ID, or your device passcode.
 Apps also have ratings that can be configured using content restrictions.
 You can also add specific websites to an approved or blocked list, or you can limit access to only approved websites. Follow these steps:
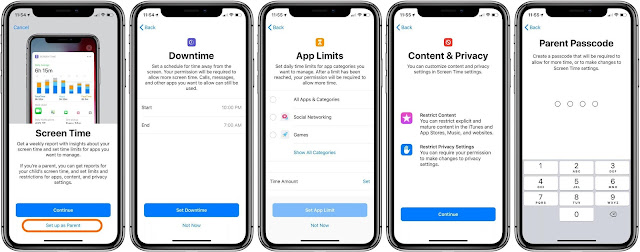
 For example, you can allow a social-networking app to request access to use the camera, which allows you to take and upload pictures.
 Apple assumes no responsibility with regard to the selection, performance, or use of third-party websites or products. Apple makes no representations regarding third-party website accuracy or reliability. Contact the vendor for additional information.
 You just have to know how to set them up.
 " Devon Delfino
 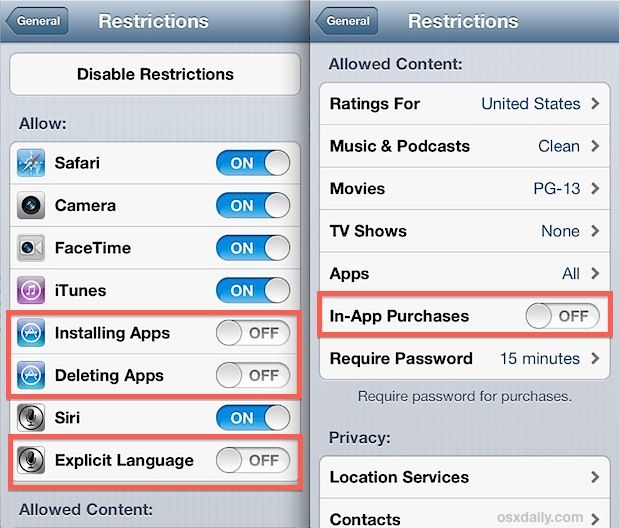 Then toggle on the Content & Privacy Restrictions option and create a passcode so that you have access to the Screen Time parental controls, but your child does not.
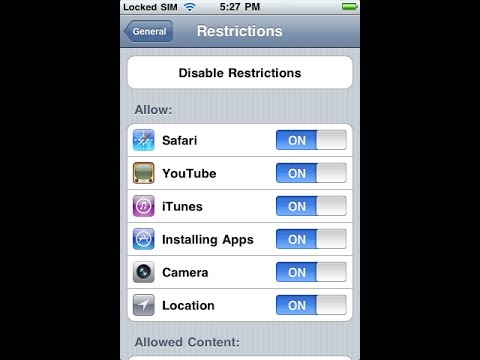 Open the Settings app on your iPhone or iPad.
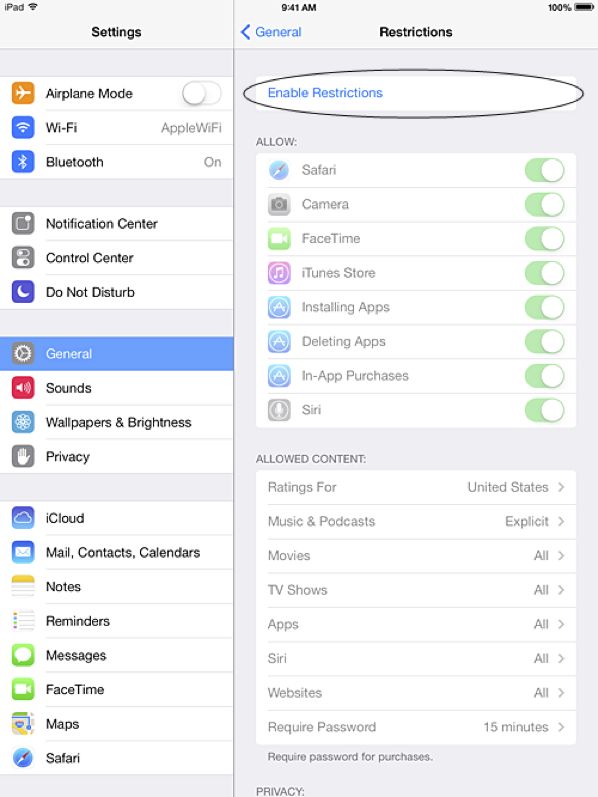 Choose Don't Allow where desired.
 " Devon Delfino
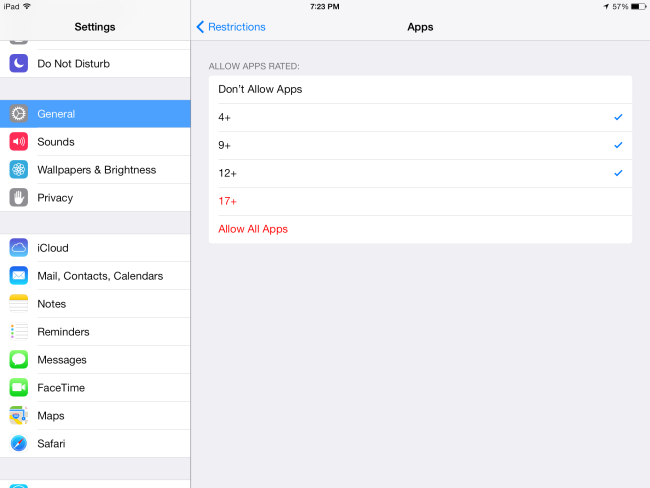
 Once you make that selection, you can fine-tune the controls by adding websites to the list of allowed (or not allowed) sites.
 Devon Delfino

 Her work has been featured in publications such as The Los Angeles Times, Teen Vogue, Business Insider, and CNBC. Follow her on Twitter at @devondelfino.
 Dave is the author of more than two dozen books and has contributed to many sites and publications including CNET, Forbes, PC World, How To Geek, and Insider.

 But in body there is only one p element, so it will get styled. And also there is only one span element in the p container, so it will be styled as well.
 e. penultimate */ } tr:nth-last-child(2n+1) { background-color: #eee; /* odd lines starting from the end */ }
  To create such a password, go to Mail on desktop → "Security" → "Passwords for external apps", or follow the link if you use Mail on a mobile browser. You cannot create such a password in the Mail mobile app.
  What's this?
 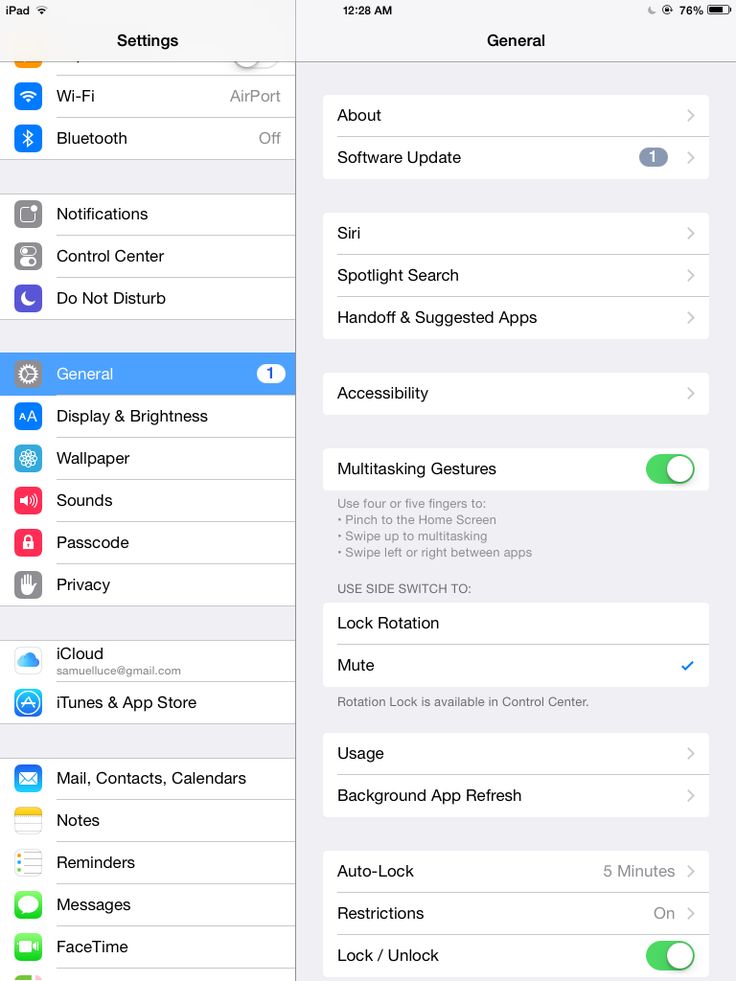 Check that the "Use SSL" setting is enabled in the "Incoming Settings" section, and the server port is 993 .
 Touch Done.