urdf/tutorials/building%20a%20visual%20robot%20model%20with%20urdf%20from%20scratch - ROS Wiki
Please see EditingTheWiki for guidelines on how our wiki is organized and tips on creating new pages.
ROS package or Stack
If you're creating the initial page for a stack or package, please give it the page the same name as the stack or package itself, and use one of the following templates:
If you're creating additional documentation for a package or stack, feel free to structure them however you like, but please keep them within the namespace of your package (e.g. "ros.org/wiki/my_package/more_details") Create new empty page
Tutorials
To keep tutorials organized, each stack and package has a link to tutorials at the bottom of the page. If you got here via that link please start a list of tutorials with this template:
TutorialIndexTemplate
Once you save that page, it will have a "Create Tutorial" button that you can use to create new tutorial pages which will be automatically indexed and easier for users to find. Also the WritingTutorials page outlines how to write a tutorial.
Troubleshooting
If you're starting a troubleshooting page for a stack or package which doesn't currently have one:
TroubleshootingTemplate
If none of these cover your situation, you can create a blank page Create new empty page
Or choose a page template to create an already-formatted page:
Before creating the page, please check if a similar page already exists. Here are some existing pages with similar names:
CategoryTemplate
ChangelistTemplate
ContestCSHeaderTemplate
ContestEntryCSHeaderTemplate
ContestEntryTemplate
ContestIndexTemplate
ContestTemplate
CreateTutorialTemplate
GithubPackageTemplate
HelpTemplate
HomepageGroupsTemplate
HomepagePrivatePageTemplate
HomepageReadPageTemplate
HomepageReadWritePageTemplate
HomepageTemplate
PackageAPIReviewTemplate
PackageCodeReviewTemplate
PackageDocReviewTemplate
PackageReviewIndexTemplate
PackageTemplate
ProjectGroupsTemplate
ProjectTemplate
PublicationTemplate
RoadmapTemplate
RobotOverviewTemplate
ScottHassan/TestTemplate
SlideShowHandOutTemplate
SlideShowTemplate
SlideTemplate
StackAPIReviewTemplate
StackCodeReviewTemplate
StackDocReviewTemplate
StackReviewIndexTemplate
StackRoadmapTemplate
StackTemplate
SyncJobTemplate
TroubleshootingTemplate
TutorialCSHeaderTemplate
TutorialIndexTemplate
TutorialTemplate
es/TutorialCSHeaderTemplate
fr/TutorialCSHeaderTemplate
platform_group/Template
rviz/DisplayTemplate
urdf/Tutorials/Building a Movable Robot Model with URDF
urdf/Tutorials/Building a Visual Robot Model with URDF from Scratch
Learning to Write and Draw
February 24, 2017
For very young children, there are four stages of drawing and learning to write that you may see as your child grows from 15 months to 3 years old. By offering repeated fun experiences with a variety of art and writing materials, you will see forward progress over time.
How Your Child’s Writing and Art Changes Over Time
Creativity is a bridge to learning. When your child is creative and curious, she can come up with answers to the problems she encounters—like how to keep the block tower from falling. Creativity helps your child become a thoughtful, inquisitive, and confident learner later on, when she starts school.
One of the most important ways that your toddler is tuning in to her creativity is by experimenting with art materials. As she grabs that chunky crayon and gets to work, you will see her art and writing change and become more controlled and complex as she grows.
For very young children, art and early writing skills are one and the same. At first, it’s all about just figuring out what these cool things called crayons can do. Then your child discovers the link between her hand holding the crayon and the line she made on the page: Presto! She experiences the power of cause-and-effect. Imagine how exciting this must be for her! She can now make a real “mark” on the world. This leap in thinking skills is helped along by her new ability to hold things in her hands and fingers. The growing control your child has over the muscles in her hands lets her move a marker or paintbrush with purpose and with a goal in mind.
For very young children, there are four stages of drawing and writing that you may see as your child grows from 15 months old to 3 years old. Note that the timetables listed below are approximate; your child may master these skills faster or slower and still be developing just fine. Growth doesn’t happen at the same speed for every child, but by offering repeated fun experiences with a variety of art and writing materials, you will see forward progress over time.
Stage 1: Random Scribbling (15 months to 2½ years)
This is the period when young children are just figuring out that their movements result in the lines and scribbles they see on the page. These scribbles are usually the result of large movements from the shoulder, with the crayon or marker held in the child’s fist. There is joy in creating art at all ages, but at this stage especially, many children relish the feedback they are getting from their senses: the way the crayon feels, the smell of the paint, the squishy-ness of the clay.
For other children, this sensory information may be too much and they may not enjoy some art activities at this stage (like finger-painting). As they grow to tolerate more sensory input, you can incrementally re-introduce art activities into their routine.
Stage 2: Controlled Scribbling (2 years to 3 years)
As children develop better control over the muscles in their hands and fingers, their scribbles begin to change and become more controlled. Toddlers may make repeated marks on the page—open circles, diagonal, curved, horizontal, or vertical lines. Over time, children make the transition to holding the crayon or marker between their thumb and pointer finger.
Stage 3: Lines and Patterns (2½ years to 3½ years)
Children now understand that writing is made up of lines, curves, and repeated patterns. They try to imitate this in their own writing. So while they may not write actual letters, you may see components of letters in their drawing. These might include lines, dots, and curves. This is an exciting time as your toddler realizes that his drawing conveys meaning! For example, he may write something down and then tell you what word it says. This is an important step toward reading and writing.
Stage 4: Pictures of Objects or People (3 years to 5 years)
Many adults think of “pictures” as a picture of something. This ability to hold an image in your mind and then represent it on the page is a thinking skill that takes some time to develop. At first, children name their unplanned creations. This means that they finish the picture and then label their masterpiece with the names of people, animals, or objects they are familiar with. This changes over time.
Soon you will see your child clearly planning prior to drawing what he will create. You will also see more detail in the pictures, more control in the way your child handles the crayon or marker, and the use of more colors. What else to be on the lookout for? Children’s first pictures often build off circles. So, you may see a sun—an irregular circle, with lots of stick “rays” shooting out—or a person (usually a circle with roughly recognizable human features).
Once your child has begun to purposefully draw images, she has mastered symbolic thinking. This important milestone in thinking skills means that your child understands that lines on paper can be a symbol of something else, like a house, a cat, or a person. At this stage, your child also begins to understand the difference between pictures and writing. So you may see him draw a picture and then scribble some “words” underneath to describe what he has drawn or to tell a story. When your child is able to share his story with you, he will be motivated to “author” more and more work as he grows.
Stage 5: Letter and Word Practice (3 to 5 years)
Children have had experience with letters and print for several years now and are beginning to use letters in their own writing. Usually children start by experimenting with the letters in their own names, as these are most familiar to them. They also make “pretend letters” by copying familiar letter shapes, and will often assume that their created letter must be real because it looks like other letters they have seen (Robertson, 2007).
During this time, children also begin to understand that some words are made of symbols that are shorter and some words are made of symbols that are longer. As a result, their scribbles change. Rather than one long string of letters or letter-like shapes, your child’s writing now has short and long patterns that look like words or sentences. While these letters and words are probably not technically correct, it does not matter. This exciting milestone means that your child is beginning to understand that text and print have meaning.
What Can You Do to Encourage Art and Writing Skills
A young child learns to paint
Make art a regular part of playtime.
Offer chunky, easy-to-grip crayons, thick pencils, and washable markers. Cut paper bags up to draw on. Sometimes it helps young children out if you tape the paper down on the table so it doesn’t move as they draw. As your child grows, you can include washable paints, child-safe scissors and glue, and homemade salt-dough as part of your child’s creative time. (For salt-dough recipes, check the Internet or your local library.) Let your child wear an old shirt of yours (with sleeves cut off) as a smock and lay newspaper or an old shower curtain over the table to keep it clean.
No need for instructions.
Let your child experiment and explore. Creativity means having the power to express yourself in your own way (Lagoni et al., 1989). This independence is just what a growing toddler is looking for to feel confident, competent, and clever. By sitting nearby, observing, and taking pleasure in your child’s creation, you are providing all the guidance he needs.
Notice the process, not just the product.
As parents, we often tend to compliment children on their successes: What’s that a picture of? A house? That’s great! And sometimes we get hung up on the fact that trees should be green, not purple. Sometimes we quiz: What’s the name of that color? But children learn more when we don’t focus so much on what they are drawing, but on what they are thinking about their drawing. Take a few moments to observe your child’s work: Look at the lines you are making—there are so many of them! Or, That picture is really interesting. Those colors make me feel happy. Or, I see you are working really hard on your drawing. Or just: Tell me about your picture. Then see if your child is interested in sharing more.
Experiment with a variety of art materials as your child nears 3.
Let children paint with cotton balls, q-tips, sponges, string—you name it. Give your child crayons and rub over a textured surface (like a coin or a screen). Draw with chalk outside on a sidewalk; see how water changes the color of the chalk. Add powdered paint or glitter to your child’s sand play. Or add a new dimension to water play by adding drops of washable food coloring to the water. What happens when you mix two different colors of water together?
Use art to help your child express strong feelings.
Is your child having a tantrum? Offer some play-dough or set out the markers and paper and suggest she make a very, very angry picture. Creative activities can sometimes help children express and make sense of feelings that are too intense for them to share in words.
Encourage your child’s attempts to write.
If your child scribbles something and then tells you what he “wrote,” take it seriously. Let him take his “shopping list” to the supermarket or mail his (scribbled) letter to Grandma. This is how children learn that words are powerful and have meaning.
Display your child’s art and writing.
This is how your child knows her work is valued and important.
Creative activities help children to learn how to solve problems, come up with their own answers, discover the cause-and-effect of their actions, and feel confident about the choices they make. Art experiences help children develop independence within limits, and gives them the opportunity to represent their ideas on paper or in other formats. Most important, creative expression lets children tap into the magic of their own imaginations—which is what being a child is all about.
Resources and References
Farrell-Kirk, R. (2007 February). Tips on understanding and encouraging your child’s artistic development. Downloaded on June 10, 2008.
Gable, S. (2000). Creativity in young children. University of Missouri Extension. Downloaded on June 10, 2008.
Kentucky Cooperative Extension Service. (n.d.). My child is an artist! The stages of artistic development. Downloaded on June 10, 2008.
Lagoni, L. S., Martin, D. H., Maslin-Cole, C., Cook, A., MacIsaac, K., Parrill, G., Bigner, J., Coker, E., & Sheie, S. (1989). Good times being creative. In Good times with child care (pp. 239–253). Fort Collins, CO: Colorado State University Cooperative Extension. Downloaded on June 10, 2008.
Levinger, L, & Mott, A. (n.d.). Developmental phases in art. Downloaded on June 10, 2008.
Robertson, R. (2007, July/August). The meaning of marks: Understanding and nurturing young children’s writing development. Child Care Exchange, 176, 40–44.
Downloads
Read More
Related Resources
View All Resources
Support ZERO TO THREE
We need your support now more than ever to ensure all babies have access to the quality care, services and support they need to thrive.
Donate
Links in HTML • Vertex Academy
Vertex Academy html link in a new window, html links, html links within a page, html5, how to make a transition to another page html, how to make a link, how to make a html link, how to make a link to a site in html, how to create a hyperlink in html, links in html, tag
This article was written by the Vertex Academy team. This is one of the articles from our HTML&CSS Tutorial. We hope that this article will be useful to you. Happy reading! nine0010
Links are what make the World Wide Web as we know it. They allow you to travel from one site to another, i.e. surf. Links, like berry after berry when picking strawberries, beckon us, drag us along ... and do not let us fall asleep on time 🙂
Links are different, but most often they are:
from one site to another
from one page to another within the same site
within one page - from one part of it to another
links that launch an email program and allow you to send an email to a specific address.
Link is created using tag (from English Anchor, anchor). The href attribute is used to specify the address where the user is redirected to. The address itself is written in quotation marks. Between the tags, the text of the link is indicated. It is desirable that he explain to the user where he will go, and not just say something like "Click here". nine0010
When clicking on any of the words placed inside the element, the user follows the specified link. By default, when you hover over a link, the mouse pointer turns into a pointing hand and the color of the link changes.
Absolute and relative references
Let's imagine that a courier comes to your neighbor and asks where to find your apartment. A neighbor can start from afar: "planet Earth, the continent of Eurasia, the country of Ukraine, the city of Kyiv, Mechnikova street, house 16, apartment 41." Or maybe just say "yes, here is his apartment, to my left. " In the first case, the neighbor gave the courier (browser) an absolute link, and in the second, a relative one. nine0010
Absolute links are used to navigate to another site. They meet the requirements of designation of URL , i.e. contain a data transfer protocol (for example, http:// ), the site's domain name, and the path to a specific site page. If the path is not specified, then the main page will open by default. In the example above, there is an absolute link leading to the main page of the site.
Relative links are used to navigate within the same site (from page to page or from one place to another). This is especially convenient if you are just creating your site and have not yet published it. If you created your first web page with us, it's time to create your second one and see how relative links work 🙂
A link to a document in the same folder
So, let's create another html document with any name in the same HTML_Start folder (this is our root folder), for example about. html
Since they are neighbors, the link from the index. html can be very short and just page name : about.html
Home </ Title> </p> <p> <Meta charset = "UTF-8"> </p> <p> </ED> </p> <p> <BODY> <BODY> </p> <p> <p>My first web page</p> </p> <p> <a href="about.html">More</a> </p> <p> </body> </p> <p> </html> </p> </td> </tr> </table> <h5> Links to the document in folders below </h5> <p> Often, when creating a site with one root directory, things are not enough, and additional folders are created, for example, to store images, videos, or just with a different theme.<img loading='lazy' src='/800/600/http/i.pinimg.com/originals/0a/7d/f7/0a7df74efeb7d9407b3020674f403b29.jpg' /> Let's create another folder in our HTML_Start folder, Lessons. This folder will be one level down and become <strong> child </strong> in relation to our root directory, and it will be <strong> parent </strong> in relation to it. </p> <p> In the Lessons folder, let's create a links.html file and try to link to it from the main page. To do this, you need to specify: </p> <p> <strong> folder name </strong> , <strong> slash </strong> (symbol /), and then <strong> page name </strong> : </p> <p> <body> <p>My first web page</p> <a href="Lessons/links.html">How to create links in HTML</a> </body> </p> <table> <tr> <td data-settings="show"> </td> <td> <p> <body> </p> <p> <p>My first web page</p> </p> <p> <a href="Lessons/links.html">How to create links in HTML</a> </p> <p> </body> </p> </td> </tr> </table> <p> </p> <p> If you create another folder inside the Lessons folder, for example HTML, then this folder will be 2 levels lower and will become <strong> grandchild </strong> for our root directory, and it will be 9 for it0031 grandparent </strong> .<img loading='lazy' src='/800/600/http/i.pinimg.com/736x/be/9d/52/be9d52e5a2c2d70ed1e54317257560d5--anime-drawing-tutorials-anime-beginner-drawings.jpg' /> Let's create a Practice.html file in it. To get from the main page to a page that lies in the HTML grand folder, the path should be written like this: <a href="Lessons/HTML/Practice.html">Exercises</a> </p> <table> <tr> <td data-settings="show"> </td> <td> <p> <a href="Lessons/HTML/Practice.html">Exercises</a> </p> </td> nine0116 </table> <h5/> </h5><h5/> <h5> Links to the document in the parent folder </h5> <p> To make web browsing easier, it is useful to make links leading back to, for example, the home page. To create a link to a page in the parent folder, you need to enter <strong> two dots and a slash </strong> - this will indicate that the file is in the folder one level higher, and then the name of the file itself. For the links.html file located in the Lessons folder, the syntax will be: </p> <p> <a href="../index.html">Home</a> </p> <table> <tr> <td data-settings="show"> </td> <td> <p> <a href="../index.html">Home</a> </p> </td> </tr> </table> <p> . <a href="../../index.html">Home</a> </p> <table> <tr> <td data-settings="show"> </td> nine0092 <p> <a href=".<img loading='lazy' src='/800/600/http/cdn3.vectorstock.com/i/1000x1000/11/22/sketch-small-children-vector-29391122.jpg' /> ./../index.html">Home</a> </p> </td> </tr> </table> <p> </p> <hr/> <h5/> </h5><h5> Let's once again remember who is related to whom: </h5> <p> <br/> Lessons - <strong> child folder </strong> for HTML_Start, to link to the file in it we write </p> <p> <a href="Lessons/links.html">HTML Links</a> </p> <table> <tr> <td data-settings="show"> </td> <td> <p> <a href="Lessons/links.html">HTML Links</a> </p> </td> </tr> </table> <p> HTML_Start is the <strong> parent folder for the Lessons folder. To return to a higher level from the Lessons folder, write </p> <p> <a href="../index.html">Home</a> </p> <table> <tr> <td data-settings="show"> </td> <td> <p> <a href="../index.html">Home</a> </p> </td> </tr> </table> <p> HTML - <strong> grandchild </strong> folder for HTML_Start, to refer to the file in it, you must also specify "by father" </p> <p> <a href="Lessons/HTML/practice.html">HTML Links</a> </p> <table> <tr> <td data-settings="show"> </td> <td> <p> <a href="Lessons/HTML/practice.html">HTML Links</a> </p> </td> </tr> </table> <p> HTML_Start - <strong> parent folder </strong> for the HTML folder, in order to go up two levels from the HTML folder, write: </p> <p> <a href=".<img loading='lazy' src='/800/600/http/i.pinimg.com/236x/d7/28/2a/d7282a1c613bcdf7747c1af5d28b56d5.jpg?nii=t' /> ./../index.html">Home</a> </p> <table> <tr> <td data-settings="show"> nine0091 <td> <p> <a href="../../index.html">Home</a> </p> </td> </tr> </table> <h5> Link in a new window </h5> <p> By default, clicking on a link opens a new page in the same window as the current one. If it leads to an external site, then the user automatically leaves yours. If we want our site not to be closed for the user, we can force the link to open in a new browser window or tab (depending on the browser settings). nine0010 <p> The attribute <strong> target = "_blank" is used for this. </strong> </p> <p> This is the first time we have used two attributes for one tag. Note that they are separated only by a space, no commas or anything like that! <br/> </p> <h5> </h5><strong> Link to e-mail </strong> </h5> <p> If the site has a "Contact Us" section, you can create a link that, when clicked, will open the user's e-mail program installed on his computer and he will only have to write a letter. nine0010 <p> To do this, at the beginning of the value of the href attribute, we put " <strong> mailto: </strong> " and then the email address.<img loading='lazy' src='/800/600/http/i.pinimg.com/736x/2a/c9/2e/2ac92e5a19d1d11fb7e6f6abde66eab7.jpg' /> <br/> </p> <h5> Link to a specific part of the page </h5> <p> When the page is quite long, it is convenient to make something like a menu at the top of it to navigate the page. And also from the bottom of the page, you can return the visitor to the top so that he does not have to scroll back for a long time. In order to be able to jump around the page like this, we need to mark each of those sections to which we want to create a link ( <strong> bookmark </strong> ). </p> <p> You can mark a site using the <strong> id attribute </strong> . This attribute can be assigned to any HTML markup element, be it a paragraph, an image, a heading, whatever. To create a link to this section, the value of the href attribute must begin with a hash mark "#", followed by the value of the id attribute. For example <strong> <a href="#top"></a> </strong> </p> <h5> Image as a link </h5> <p> It often happens that when we click on an image, we go to another page. To create an image as a link, you need to write the path to the image instead of the link text.<img loading='lazy' src='/800/600/http/i.pinimg.com/236x/c9/5c/75/c95c7510f1aa3a075946334c25279907--how-to-draw-link-from-zelda-step-by-step-toon-link.jpg?nii=t' /> In this example, picture.jpg is in the same folder as the link page: </p> <p> <a href="links.html"><img src="picture.jpg"></a> </p> <table> <tr> <td data-settings="show"> </td> <td> <p> <a href="links.html"><img src="picture.jpg"></a> </p> </td> </tr> </table> <p> If the image is located in another folder on your site, the relative path is specified for it in the same way as for files. </p> <p> If the image is in a different place, not on your site - specify the absolute path: </p> <p> For more information about images, see our other article 🙂 <br/> See you soon! </p> <p> </p> <br/> <h2> Absolute and relative references (external and internal) </h2> <ul> <li> Relative path </li> <li> Absolute path </li> </ul> <p> All HTML links are divided into external and internal. External links are links that lead from one site to another site or file located on another site. Internal links are links that link from one page of the site to another page on the same site or to sections of the same page.<img loading='lazy' src='/800/600/http/i.pinimg.com/736x/d5/c6/8d/d5c68d18df051a8f36673391911909b2.jpg' /> nine0010 <p> All external links in the <code> href </code> attribute of the <code> <a> tag </code> contain the absolute path to the document they link to. Internal links, in turn, can contain both an absolute path and a relative one (in this case, it depends on your personal preferences). </p> <p> All links can also be conditionally divided into relative and absolute. Relative links are HTML links containing relative paths, relative links can only be internal. Absolute links are links containing absolute paths, absolute links can be both external and internal. nine0010 <h3> Relative path </h3> <p> Relative path means that specifying the path to the desired file or page on your site starts relative to the directory where the page with the link is located, or relative to the root directory of the site. Consider the parts that a relative path can consist of: </p> <table> <tr> <th> Parts of a path </th> <th> Description </th> <th> Sample values </tr> <tr> <td> filename </td> <td> If only the file name is specified as the attribute value, it means that the required file is located in the same folder as the page with the link.<img loading='lazy' src='/800/600/http/i.pinimg.com/736x/94/9c/5c/949c5c4a9285eb9d5b099e343716426b.jpg' /> nine0091 <td> "<code> page.html </code> " </td> </tr> <tr> <td> catalog / </td> <td> If the file to which you need to specify the path is located in a child directory relative to the file with a link, this means that we need to go down one level (to the child folder of the current directory), in this case the path begins with the name of the child directory, after its name is indicated by a forward slash " <code> / </code> ", it serves to separate parts of the path, after it the name of the file we need is indicated. nine0002 Note: You can only go down as many folders as you have created them. For example, if you created a folder 10 levels below the root, you can specify a path that will take you down 10 folders. However, if you have so many levels, it most likely means that the organization of your site is unnecessarily awkward. </p> </td> <td> "<code> catalog/page.html </code> "<p>" <code> catalog1/directory2/page.html </code> "</p> </td> </tr> <tr> <td> ../ 9009one <td> If you want to indicate that the file you are referring to is in the parent folder, use the characters <code> .<img loading='lazy' src='/800/600/http/flomaster.club/uploads/posts/2021-12/thumbs/1639702221_46-flomaster-club-p-link-zelda-sketch-krasivie-zarisovki-50.jpg' /> . </code> (two dots), they mean go up one level (to the parent folder of the current directory). Next, we specify a forward slash " <code> / </code> " to separate parts of the path, and write the name of our file. <p> Note: the characters <code> .. </code> can be used as many times as you want, using them you go up one folder each time. However, you can climb up until you come to the root folder of your site. You cannot go higher than this folder. nine0010 </td> <td> "<code> ../page.html </code> " <p> " <code> ../../page.html </code> " </p> <p> " <code> ../../../kat1/kat2/page.html </code> " - we rise from the current folder three directories above and already from it we go down two levels below to the required file </p> </td> </tr> <tr> <td> / </td> <td> A relative path does not always have to start relative to the current location of the linking page, it can also start relative to the site's root directory. For example, if the desired file is located in the root directory, the path may begin with the character " <code> / </code> ", after which you just need to specify the name of the desired file, which is located in the root directory.<img loading='lazy' src='/800/600/http/i.pinimg.com/736x/ad/f1/9a/adf19ae0596aefdeb0f561eb486b9ccb.jpg' /> <p> Note: when the symbol " <code> / </code> " is indicated first, this means the beginning of the path from the root directory. </p> </td> <td> " <code> /page. html </code> "<p>" <code> /cat1/cat2/car.png </code> "</p> </td> </tr> </table> <h3> Absolute path </h3> <p> An absolute path is usually used to specify the path to a file located on another network resource. It is the full URL to a file or page. First of all, the protocol used is indicated in the address, followed by the domain name (site name). For example: <code> http://www.example.ru </code> - this is how the absolute path to a specific website looks like. <code> http:// </code> is the data transfer protocol, and <code> www.primer.ru </code> is the site name (domain). </p> <p> An absolute path can also be used on your own site. However, within a site, it is recommended to use a relative path as the link value. </p> <p> Now let's look at what <b> URL </b> is. Each web page on the Internet has its own unique address, which is what is called a URL.<img loading='lazy' src='/800/600/http/i.pinimg.com/originals/e6/23/70/e623706cffc2482aa2df66e5fcfff7c1.jpg' /> <table><hr><h4 class="relpost">Learn more</h4>
<ul class="relpost">
<li><a href="/misc/if-you-are-induced-how-long-does-it-take.html" title="If you are induced how long does it take"><div class="relimg"><img loading="lazy" src="/800/600/http/i.pinimg.com/736x/26/14/9a/26149aae56828efff3e0dfa48668f028.jpg" /></div>If you are induced how long does it take</a></li>
<li><a href="/misc/signs-of-overheated-baby.html" title="Signs of overheated baby"><div class="relimg"><img loading="lazy" src="/800/600/http/craicchs.org/wp-content/uploads/2019/10/signs-to-watch-out-for-breast-cancer-1024x737.png" /></div>Signs of overheated baby</a></li>
<li><a href="/misc/how-do-i-file-for-child-support-in-south-carolina.html" title="How do i file for child support in south carolina"><div class="relimg"><img loading="lazy" src="/800/600/http/umcrzngps.ru/wp-content/uploads/e/b/5/eb58cf0b0f3a50b95371b6ba283494b2.jpeg" /></div>How do i file for child support in south carolina</a></li>
<li><a href="/misc/natural-milk-supply-increase.html" title="Natural milk supply increase"><div class="relimg"><img loading="lazy" src="/800/600/http/i.pinimg.com/originals/18/be/6c/18be6c93147e964cf76d5b44b1caeac1.jpg" /></div>Natural milk supply increase</a></li>
<li><a href="/misc/sick-in-first-trimester.html" title="Sick in first trimester"><div class="relimg"><img loading="lazy" src="/800/600/http/i.ytimg.com/vi/eWgyaDM6uvw/hqdefault.jpg" /></div>Sick in first trimester</a></li>
<li><a href="/misc/when-do-you-typically-feel-the-baby-move.html" title="When do you typically feel the baby move"><div class="relimg"><img loading="lazy" src="/800/600/http/cdn.ebaumsworld.com/2020/08/05/051718/86339075/dirtymemes30doggystyleminutes.jpg" /></div>When do you typically feel the baby move</a></li>
<li><a href="/misc/can-pregnancy-cause-allergies-to-food.html" title="Can pregnancy cause allergies to food"><div class="relimg"><img loading="lazy" src="/800/600/http/i.pinimg.com/originals/a3/c5/74/a3c5743805b36ab0bb6504d312a30c7b.jpg" /></div>Can pregnancy cause allergies to food</a></li>
<li><a href="/misc/how-to-find-out-if-someone-fathered-a-child.html" title="How to find out if someone fathered a child"><div class="relimg"><img loading="lazy" src="/800/600/http/fsd.kopilkaurokov.ru/uploads/user_file_546ce878599cc/img_user_file_546ce878599cc_3.jpg" /></div>How to find out if someone fathered a child</a></li>
<li><a href="/misc/is-it-ok-to-give-baby-water.html" title="Is it ok to give baby water"><div class="relimg"><img loading="lazy" src="/800/600/http/thumbs.gfycat.com/UnripeShinyGoldenretriever-size_restricted.gif" /></div>Is it ok to give baby water</a></li>
<li><a href="/misc/crack-in-nipple-not-breastfeeding.html" title="Crack in nipple not breastfeeding"><div class="relimg"><img loading="lazy" src="/800/600/http/i.ytimg.com/vi/7uXKBs8Pnns/0.jpg" /></div>Crack in nipple not breastfeeding</a></li>
<li><a href="/misc/what-causes-hair-loss-during-pregnancy.html" title="What causes hair loss during pregnancy"><div class="relimg"><img loading="lazy" src="/800/600/http/doctorasky.com/wp-content/uploads/2018/08/What-is-Depression-2.jpg" /></div>What causes hair loss during pregnancy</a></li>
</ul></table>
 By offering repeated fun experiences with a variety of art and writing materials, you will see forward progress over time.
 Imagine how exciting this must be for her! She can now make a real “mark” on the world. This leap in thinking skills is helped along by her new ability to hold things in her hands and fingers. The growing control your child has over the muscles in her hands lets her move a marker or paintbrush with purpose and with a goal in mind.
 These scribbles are usually the result of large movements from the shoulder, with the crayon or marker held in the child’s fist. There is joy in creating art at all ages, but at this stage especially, many children relish the feedback they are getting from their senses: the way the crayon feels, the smell of the paint, the squishy-ness of the clay.
 This changes over time.
 By sitting nearby, observing, and taking pleasure in your child’s creation, you are providing all the guidance he needs.
 This is how children learn that words are powerful and have meaning.
 (n.d.). My child is an artist! The stages of artistic development. Downloaded on June 10, 2008.
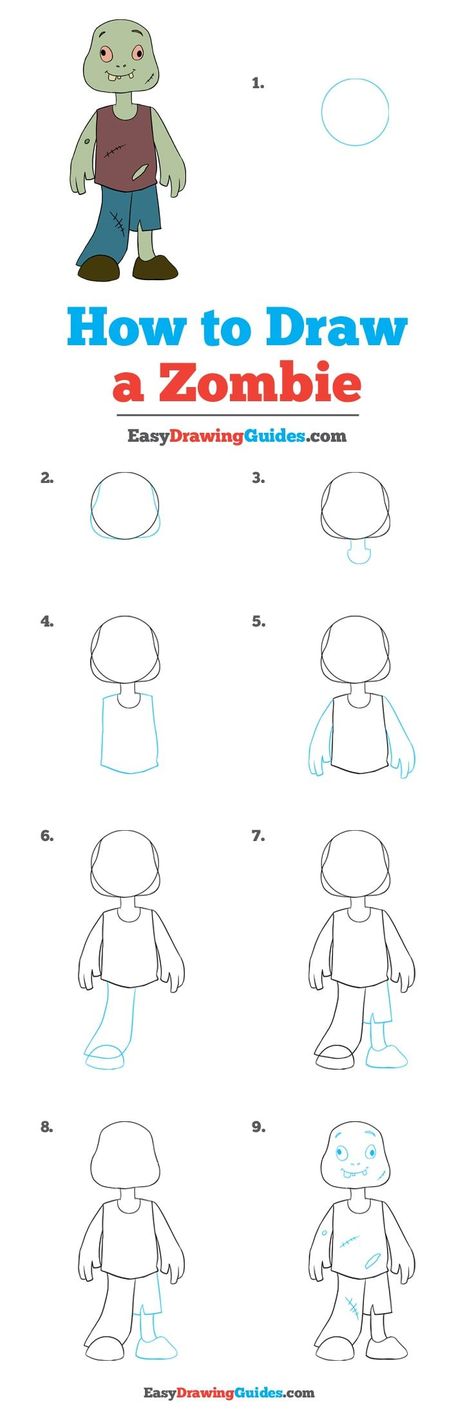
 " In the first case, the neighbor gave the courier (browser) an absolute link, and in the second, a relative one. nine0010
  html
html